Guide to creating a User Interface or Dialogue Box in Excel 2007 and Excel 2010 using a UserForm
Hi and welcome to my latest hub on Excel. Today, we will be looking at creating a User Interface using a UserForm. Every time Excel opens up a window and asks you to input data, this is done using a UserForm. Excel allows you to create your own so that you can easily collect data from users of your spreadsheet. Every UserForm uses Visual Basic to enable users to interact with it. Visual Basic is used to:
- Add functionality to the UserForm
- To configure the various options made available to users of our User Interface, and finally,
- Handle a users input into the UserForm, for example, to copy the user’s input into an Excel worksheet
UserForms have several advantages:
- They are easy and intuitive for users to use
- UserForms reduce the amount of manual data entry and the number of errors
- Data entry is controlled and can be error checked by the UserForm so that the data is entered into your workbook in a consistent and accurate manner
- A well designed UserForm is visually impactful and will make the workbook look professional
In today’s hub, we will be creating our own UserForm for my hotel business. We will be using several controls in the dialogue box, including:
- Textboxes
- Combo Boxes
- Option / Radio buttons
- Spin Buttons
In addition, the UserForm will be launched when the user clicks on a Command Button. The figures below show first of all the Command Button used to launch our Reservation System as well as the Reservation Interface and then the reservations entered into Excel using the interface:
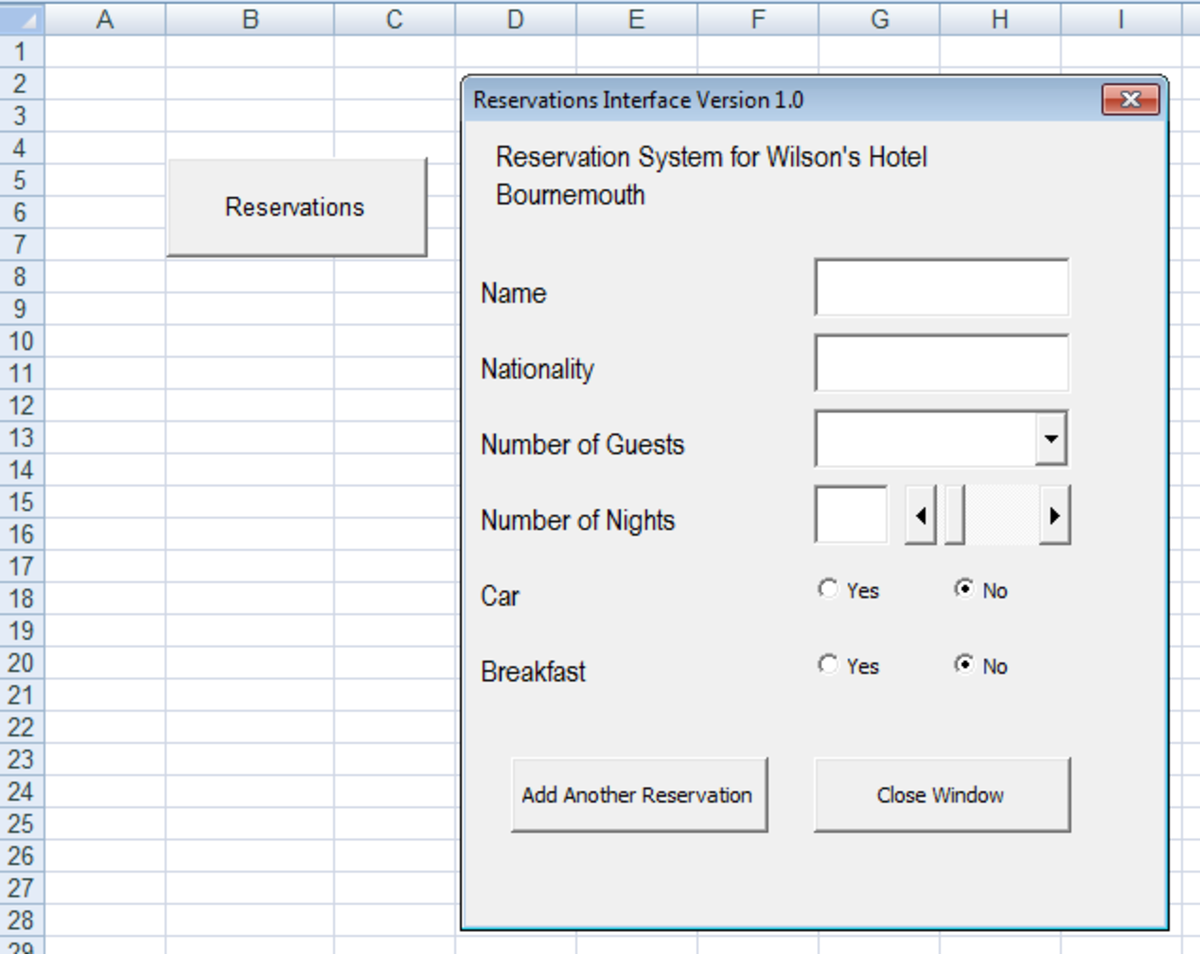
User Interface for Hotel Reservations created using a UserForm in Excel 2007 and Excel 2010.

Data entered into an Excel 2007 or Excel 2010 worksheet automatically from a UserForm.
The UserForm is run by a number of Visual Basic scripts. These scripts configure all the controls we have added and also add functionality to them. Without Visual Basic code, the user would not be able to interact with our User Interface. The scripts we will add to the UserForm include:
- One which runs when the UserForm is initiated and configures how all buttons and boxes the user can interact with
- Another allows the user to add another record
- Finally, there is one to close the User Interface when the user clicks close
These scripts are covered in a separate hub that covers all of the scripts in great detail:
I have hubs covering each of the above Controls:
Command Buttons allow you to add code to a button so that when a user presses it, the code is executed. To learn more about Command Buttons, my hubs on them can be found here:
Option or Radio buttons allow a user to select one option from a list and are perfect for Yes / No On / Off selections as we use here. I cover them in far greater detail in my hub here:
Spin Buttons allow you to quickly and easily select a number from a range. You can define the range and also the behaviour of the slider and the button. Users find them easy and intuitive to use.
Combo Boxes enable you to create a box with a configurable drop down list, from which a user can select either one or multiple items. To learn more about these powerful and useful controls:
Adding the Developer tab in Excel 2007 and Excel 2010
Before we can create our UserForm, we need to ensure that the Developer tab is visible in Excel. If you need to add the tab, the instructions are different depending on whether you are using Excel 2007 or Excel 2010.
For Excel 2007:
- Navigate to the Excel button
- Choose Excel Options
- On the Popular tab, ensure that Show Developer tab in the Ribbon is clicked
- Select OK
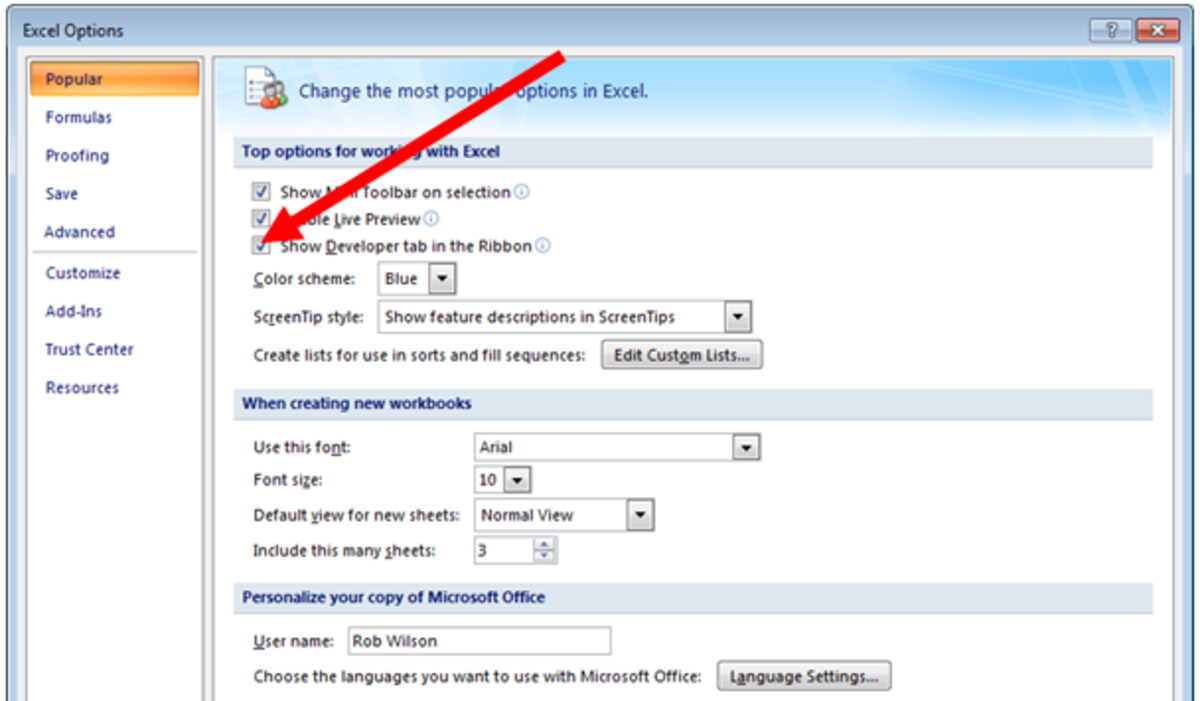
Adding the Developer tab in Excel 2007.
For Excel 2010:
- Go to the File menu
- Select Options
- Choose the Customize Ribbon tab
- Check Developer under Main Tabs as shown below
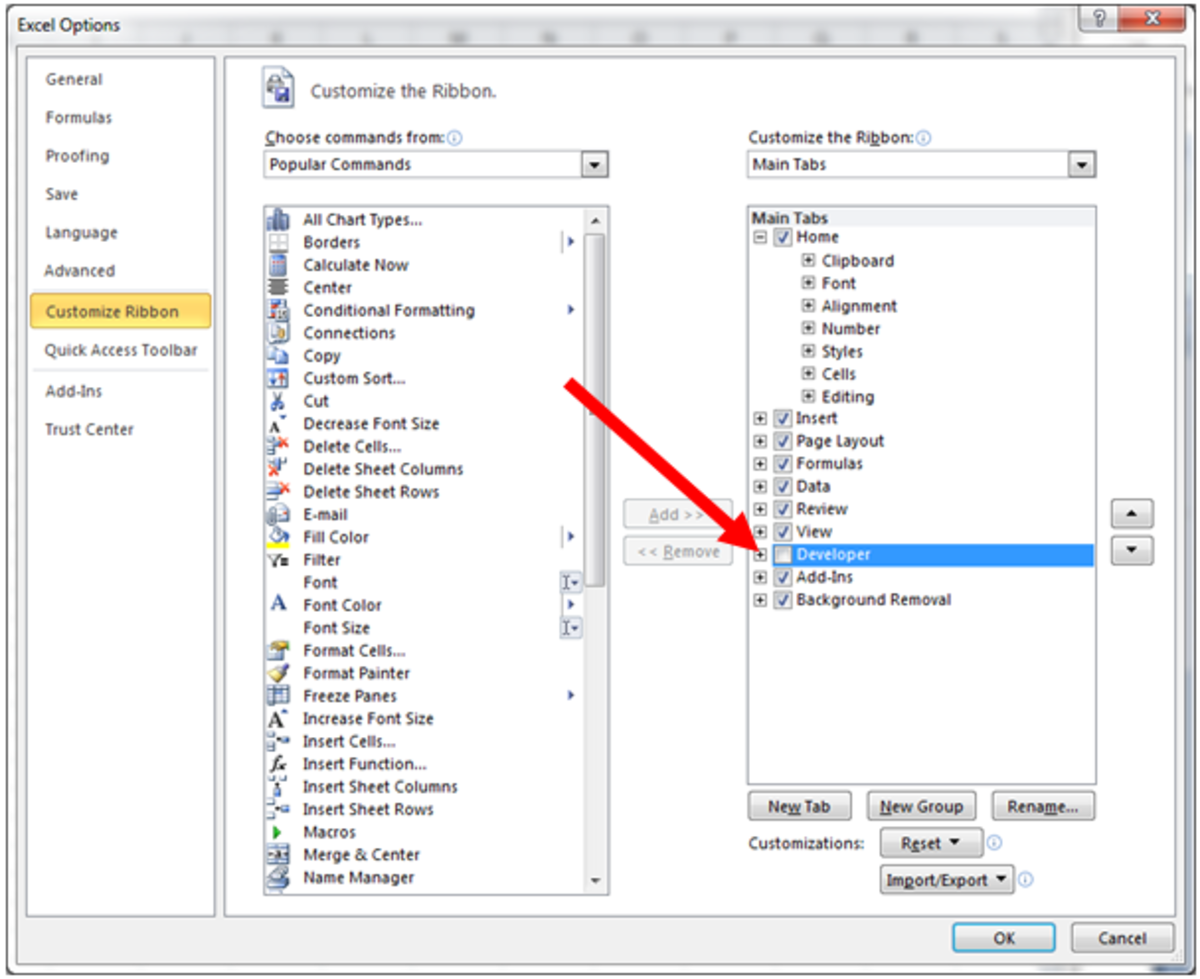
How to add the Developer tab in Excel 2010.
Creating a UserForm in Excel 2007 and Excel 2010
To begin, we need to create the UserForm that our reservations team will use to enter the data for the customer’s reservation into. To do this:
- Click the View Code button on the Developer tab
- Select the Insert menu and then UserForm
- This will create our blank UserForm
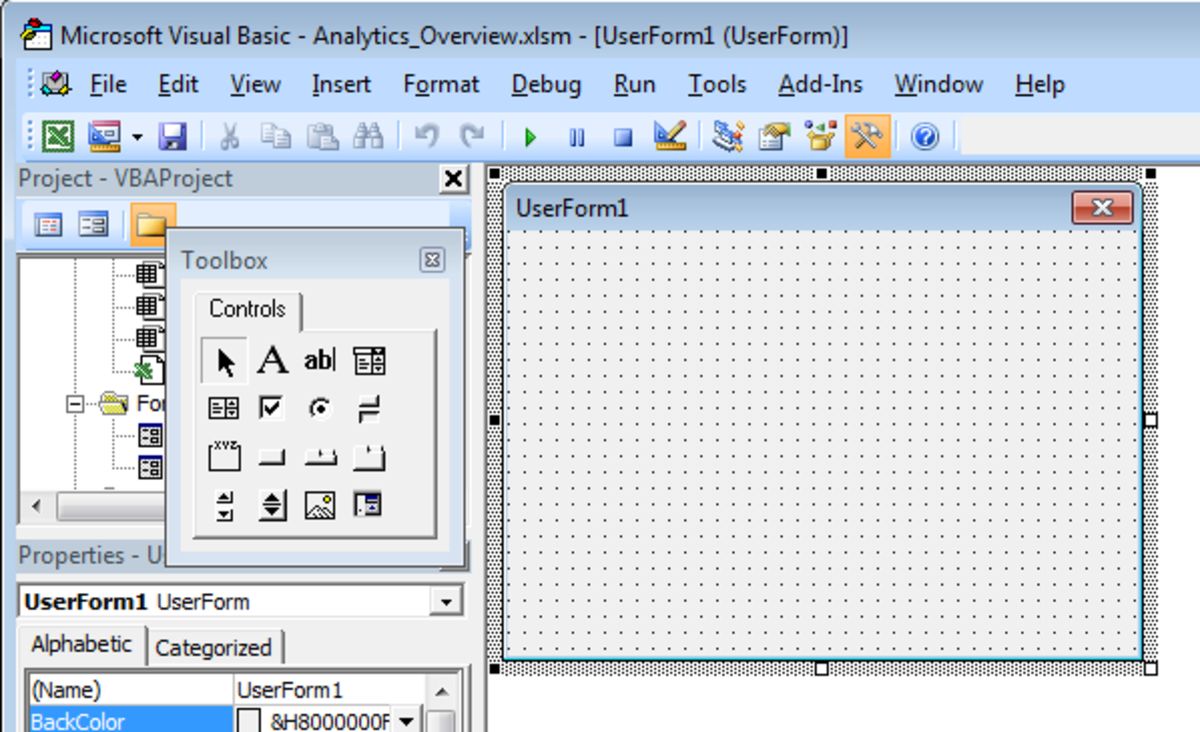
Blank UserForm created in Excel 2007 and Excel 2010.
- First, we rename the Userform by changing the (Name) in the Properties in the panel on the left from UserForm1 to Reservation_Interface
- Next, we need to change the Caption (again in Properties) to Reservation Interface Version 1.0
Now we need to create the boxes that our reservations team will enter the client’s details into:
- We now add a Label from the Toolbox to name our UserForm and enter text into the box by clicking on it (I added Reservation System for Wilson's Hotel Bournemouth)
- We can change the font by clicking on the label and then Properties and selecting Font.
- Next we add the labels for Name, Nationality, Number of Guests, Number of Nights, Car and Breakfast
Note: to create a number of identical labels, right click the first one and select Copy and then Paste
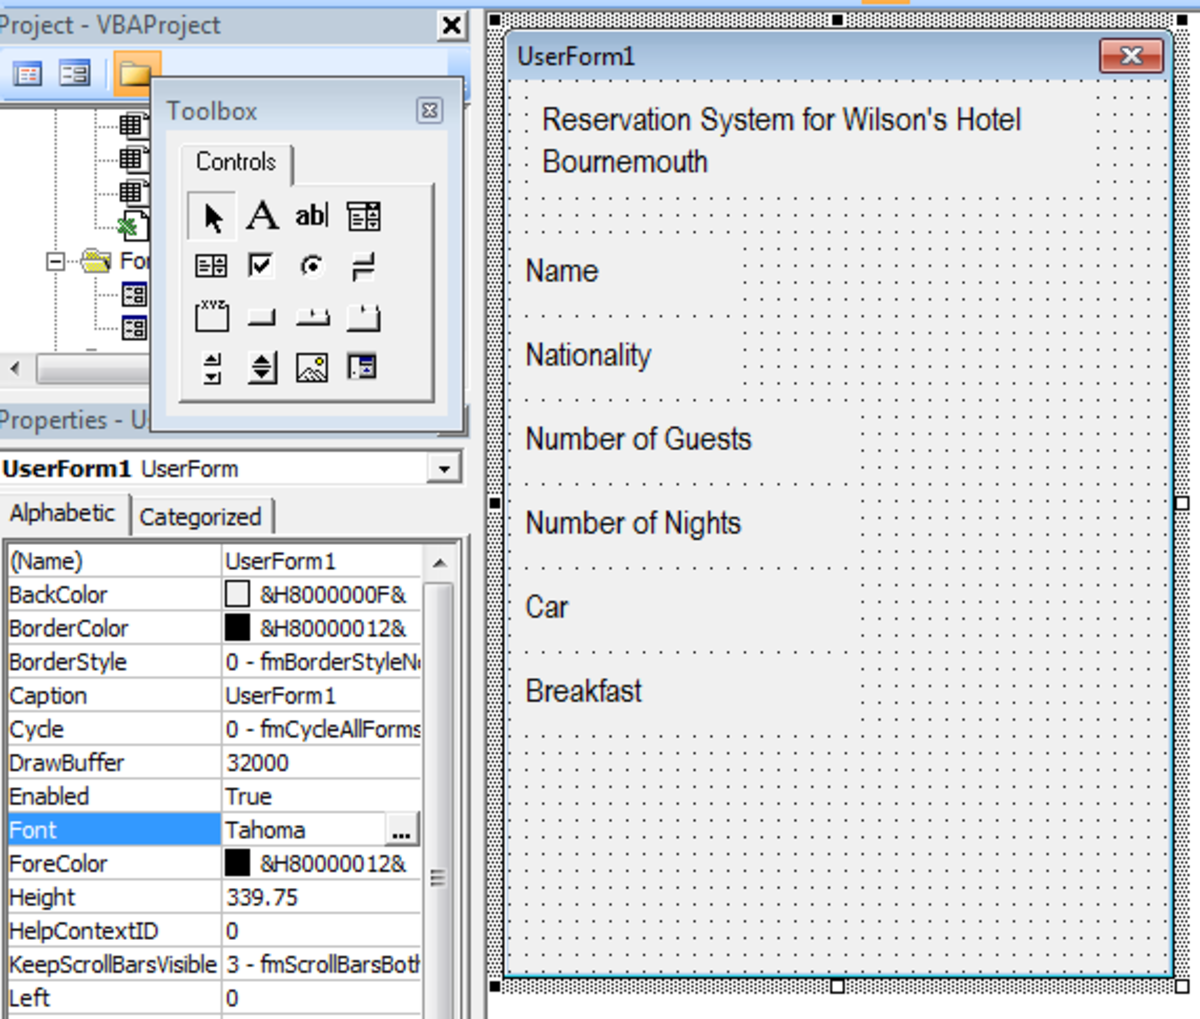
UserForm with Text Boxes added in Excel 2007 or Excel 2010.
The next step is to add the controls to our UserForm so that information can be entered about the client into the UserForm:
- For Name, Nationality and Number of Nights, we will add a TextBox (as shown above)
- Number of Guests we use a ComboBox
- Number of Nights utilises a scroll bar
- Finally for Car and Breakfast we will use an Option Buttons or Radio Button
- Add the controls in the same way that we added the Labels above by selecting them in the Toolbox and drawing them using the cursor
In order for the Option Buttons to work correctly, we need to assign both Car buttons to a Car group and both Breakfast ones to a group called Breakfast:
- Select each of the four Option Buttons in turn and in their Properties adjust the GroupName as appropriate (so the two Car buttons will be added to a group called Car and the two Breakfast buttons added to Breakfast)
Finally, we need to add two Command Buttons so that we can attach an Add box so that our reservations team can enter the client’s details into Excel and a Close box so that they can close the interface
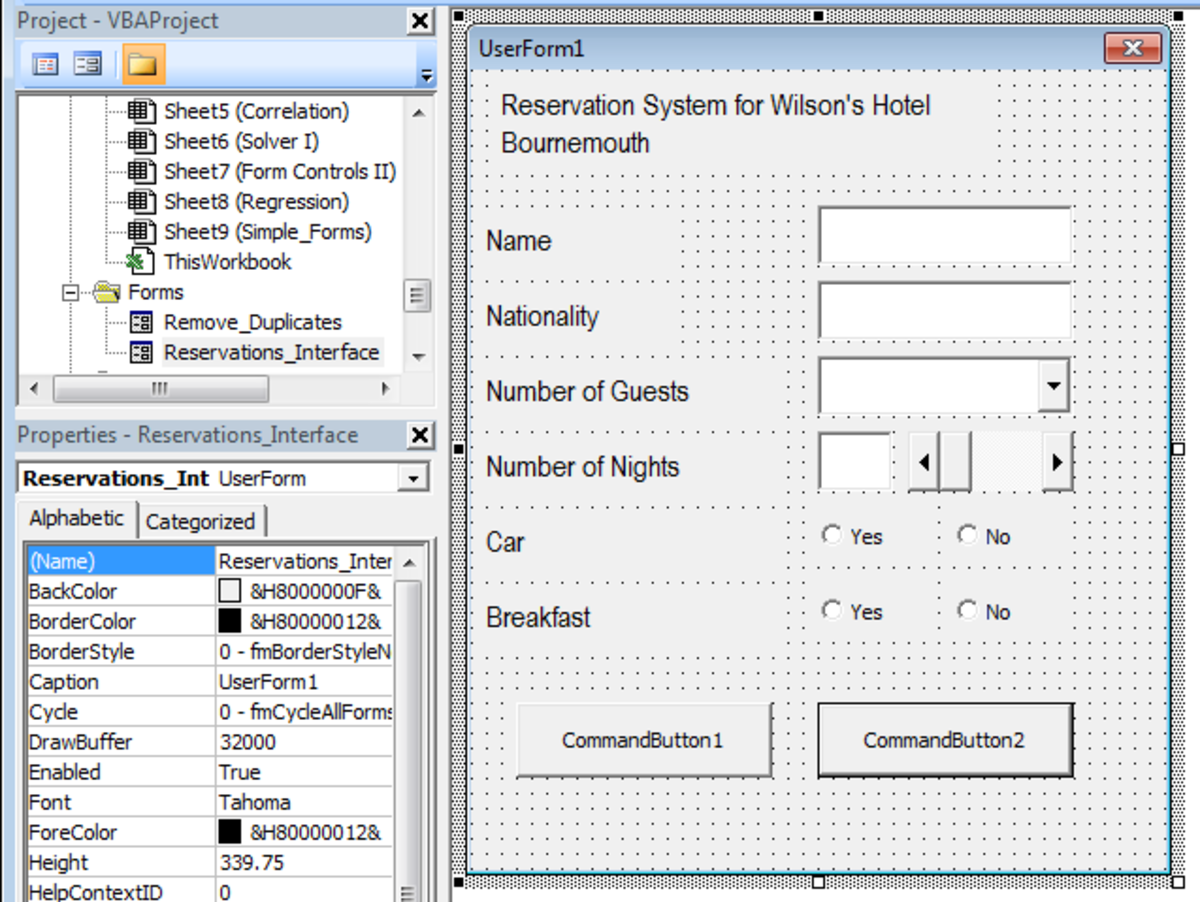
UserForm with Controls added as well as Text Boxes in Excel 2007 or Excel 2010.
To make the code that we are going to write easier to read, we need to ensure that the names of the controls we just added are the same as the text labels:
- Select the Textbox to the right of the Name label
- This will open the Properties for this Textbox
- Rename TextBox1 to Name
- Finally, we rename CommandButton1 and Command Button2
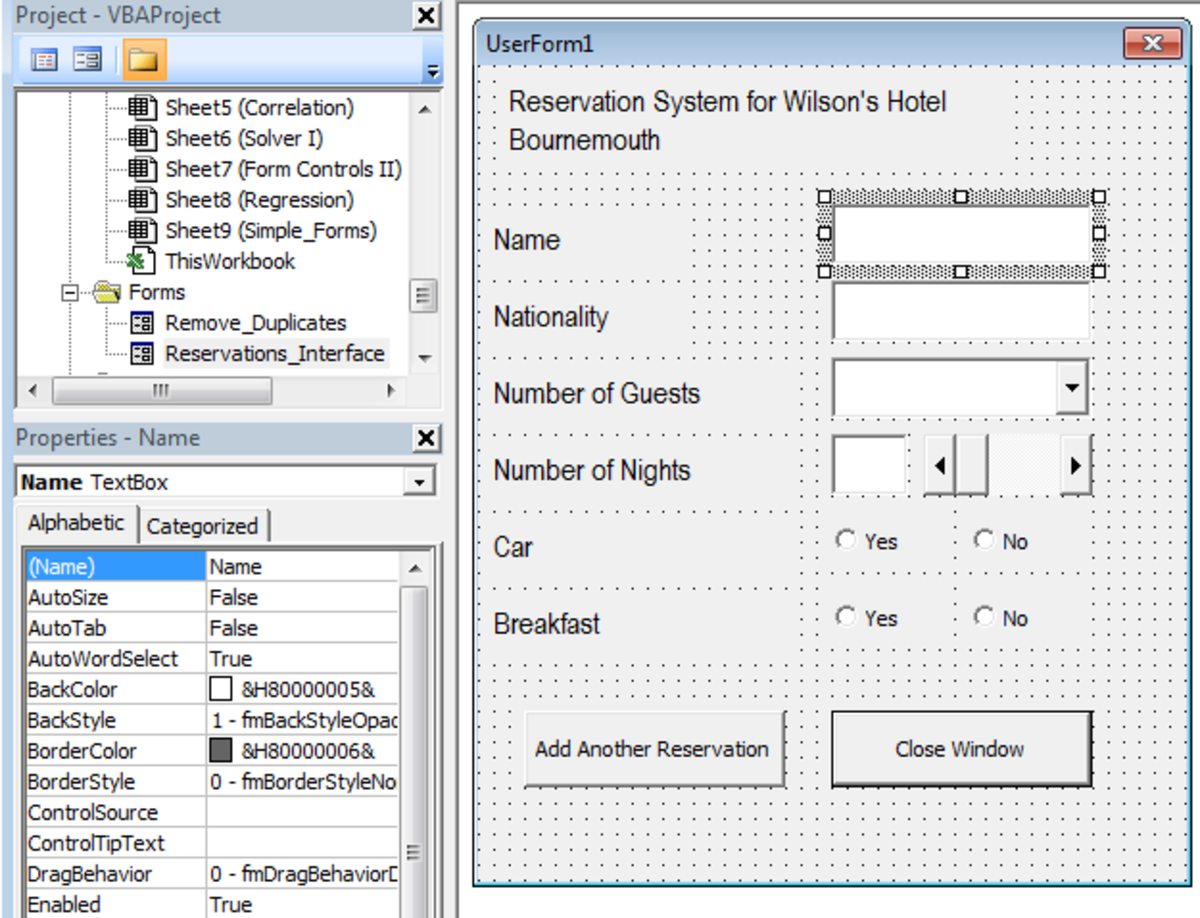
How to edit the Properties of a Control in Excel 2007 or Excel 2010.
- Repeat this process for all the controls we added.
Conclusion
A UserForm allows you to create a totally configurable User Interface for users of your Excel Workbooks. UserForms:
- Are intuitive and easy to use
- Reduce errors and the amount of manual data entry
- Data can be placed directly into the workbook from the UserForm
- Error checking can be performed on the input before it is entered into the worksheet
- Add visual impact and gives your workbooks a professional look
In today’s hub, we created a UserForm which becomes a User Interface for my bespoke Hotel Reservations Interface. We used a number of Controls to complete it, including Command Buttons, Combo Boxes, Text boxes, Spin Bars and finally Option and Radio Buttons. Many thanks for reading; I hope that you found this hub useful and informative.


No comments:
Post a Comment